
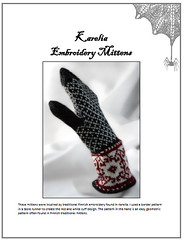
Here's the pattern for my red and black mittens. Scroll down, the English translation is below.
Ohje on suunniteltu Patons Merino-langalle, jonka neuletiheys kirjoneuleessa oli 21 s / 24 krs = 10 cm 4,25 mm puikoilla. Ohjeen mukaan lapasista tulee suurehkoon naisen kateen sopivat. Ohjeen mukaan tehtyna lapasissa on kiilapeukalo, mutta on mahdollista tehda myos tavallinen. Ohjeen mukana on piirroskaavio, joka on vasemmalle lapaselle. Oikea neulotaan peilikuvaksi.
Perustaidot lapasten neulomisesta ovat hyodyksi.
Aloitus: Luo 38 s ranneketta varten mustalla. Neulo 3 krs ainaoikeata, tee sitten koristereunus: *neulo puikon alusta 3 s oikein, kiepauta vasen puikko tyon alta niin etta se kiertyy*, toista krs loppuun. Jaa silmukat neljalle puikolle. Jatka sitten rannekkeen neulomista.
Tama on ns. latvialainen aloitus, joka on myos vihreiden sukkieni ohjeessa. Jollet halua tehda tata aloitusta, luo 38 s mustalla ja neulo 2 krs nurjaa. Jatka sitten rannekkeen neulomista.
Ranneke: Neulo 1 krs oikein. Aloita kirjoneule: *1 o punaisella, 1 o mustalla*, toista. Neulo kirjoneuletta 15 krs tai kunnes rannekkeen korkeus on n. 9 cm. Neulo sitten 2 krs nurjaa mustalla. Neulo seuraava krs oikein ja lisaa samalla sopivin valein yhteensa 9 s = 47 s. Tama lisays-krs on kaavion ensimmainen krs.
Tassa on kaaviosta pieni kuva, klikkaa kuvaa niin saat isomman kuvan.
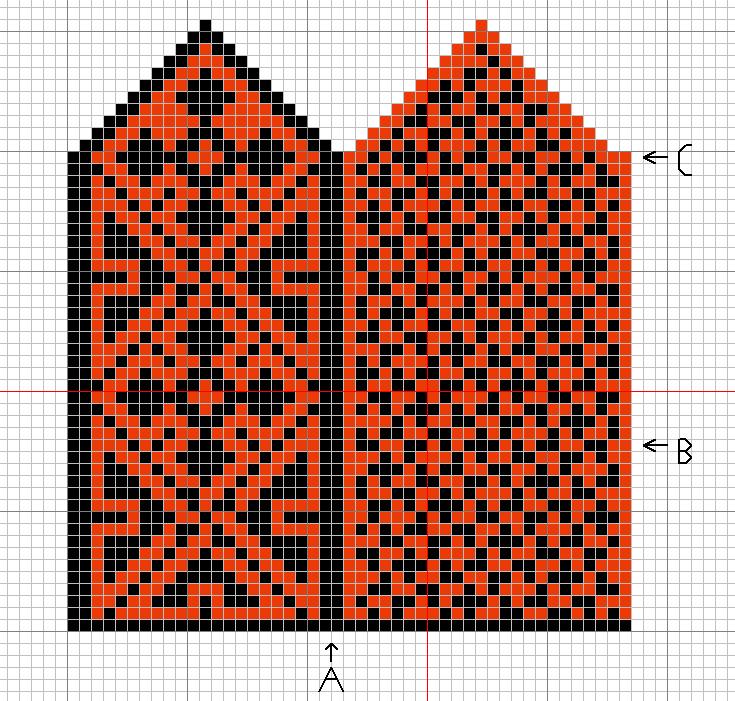
Kaavion mukaan neulominen aloitetaan oikeasta alakulmasta. Kaaviossa on merkittyna jokainen krs ja jokainen s. Oikeassa reunassa on krs:n ensimmainen silmukka. Lapaset neulotaan pyoroneuleena.
Kaaviossa on kolme nuolta, jotka on merkitty kirjaimin. Nuolen A kohdalle teet kiilapeukaloa varten lisaykset. Nuolen A molemmin puolin olevat silmukat jaavat tyohon peukalosilmukoiden erottelun jalkeen, toisin sanoen ne neulotaan myos sen jalkeen. Voit tehda ensimmaisen krs:n lisayksista 1-2 s talle kohtaa. Lisaa seuraavien krs:n aikana joka 2. krs:lla peukalokiilaa varten 2 s, niin etta niita nuolen B kohdalla on sinulla yhteensa 15 s. Peukalokiilassa reunimmaiset s:t (jotka siis nakyvat kuvassa) neulotaan mustina, naiden silmukoiden valissa neulo rannekkeen mallineuletta punaisella ja mustalla. Peukaloon muodostuu siis pitkittaisraitoja.
Nuolen B kohdalla peukalosilmukat erotetaan tyosta erikseen, eika lisayksia enaa tehda, vaan lapanen neulotaan normaalisti kaavion mukaan nuoleen C asti. Nuoli C merkkaa ensimmaista kavennuskierrosta, jolloin aloitat karjen kavennukset. Kammenpuolella kaventavat silmukat ovat punaisia, ja kammenselan puolella mustia. Toisin sanoen, kavennat reunimmaiset silmukat neulomalla ne oikeassa reunassa takareunoistaan yhteen ja vasemmassa oikein yhteen. Naita kaventavia silmukoita edeltaa kammenpuolella 1 punainen s ja kammenselassa 1 musta s. Viimeiset silmukat (3) neulotaan: *nosta 1 neulomatta, neulo 2 oikein yhteen, nosta neulottu s yli*. Katkaise lanka ja veda se s:den lapi. Neulo oikean kaden lapanen peilikuvaksi.
Peukalot: Ota 2 puikolle jattamasi silmukat kiilapeukalon lisayksista. Jos on tarpeen, voit poimia langankiertoja ja lisata nain silmukkamaaraa. Neulo pitkittaisraitakuviota 10 krs. Kavenna peukalonkarkea varten molempien puikkojen alussa ja lopussa kunnes kummallakin puikolla on vain 1 s. Veda lanka naiden lapi.
Paattele langat ja hoyryta.
This pattern is for Patons Merino yarn (black and red), with gauge as 21 stitches and 24 rows = 4" (10 cm). I used US size 6 needles (4,25 mm). My hands are rather large, so you might have to adjust the gauge to get mittens suitable for smaller hands.
According to this pattern, you will knit a gusset thumb increasing stitches. It is possible to knit a regular thumb.
There's a chart in this pattern, and the left mitten is pictured in the chart. The right mitten is a mirrored image of this.
Basic knowledge of knitting mittens might be useful.
To begin: Cast on 38 s with black yarn for the cuff. Knit 3 rows in garter stitch, and then knit the Latvian twist edging: *k 3, rotate the left hand needle under the cast-on edge and then behind and over the top of the right hand needle until the s are ready to be knit again*, rpt *-*to the end. Divide the stitches onto 4 needles and continue knitting the cuff.
If you wish not to knit the twist edging, begin by casting on 38 s and purl 2 rows. Continue knitting the cuff.
The cuff:
K 1 row. Begin the colorwork pattern: *k 1 with red, k 1 with black*, repeat *-*. Repeat this for 15 rows or until your cuff is approximately 3,5" (9 cm) long. Purl 2 rows.
During the next row, knit all stitches and increase a total of 9 stitches. All increases in this pattern are worked by knitting the stitch first through the front loop and then through the back loop. You should have 47 s now. This row of increases is the first row (from the bottom) of the chart.
Here's a small picture of the chart, click to enlarge.
Knitting according to the chart is begun from the lower right hand corner. In the chart, every stitch and every row (except for thumb gusset increases) is marked. On the right edge of the chart is the beginning of each row. The mittens are knitted in circular.
There are 3 arrows in the chart, marked with letters. Arrow A: between these two stitches you will knit the thumb gusset increases. These 2 stitches will remain to be knitted after you have separated the thumb stitches from the actual mitten, these two stitches are not part of your thumb stitches! If you wish, you may increase 1-2 stitches (on the 1st row of the chart) around arrow A. You will work the thumb gusset increases before you reach arrow B in the chart, at that point you should have 15 s for the thumb. The colorwork for the thumb is worked as in the cuff, k 1 in red and k 1 in black, so the thumb becomes striped.
When you reach the point of arrow B in the chart, leave 15 s of the thumb waiting and the mitten is knit according to the chart, until you reach the point of arrow C. Arrow C marks the first top decrease row. On the palm side the decreasing stitches are knitted with red, on the other side with black. The last stitch on each side is the decreasing stitch. On the right hand side you will knit the first two stitches together through the back loop, and on the left hand side you will knit them together regularly. The top is worked in circular with DPN's, and there are no stitches between the decreasing stitches. If you have your stitches on 4 needles, you will knit 2 stitches together through the back loop at the beginning of you 1st and 3rd needles. You will also knit two stitches together at the end of the 2nd and 4th needle. The last 3 stitches on each side are worked as follows: slip 1, knit 2 together, pass slipped stitch over. Pull the yarn through all the stitches.
Knit the right hand mitten like the left hand mitten, the chart must be a mirrored image for this.
Thumbs: pick the stitches you left waiting for the thumb. Knit vertical stripes for 10 rows. I knitted the thumbs with 2 needles, and decreased in the beginning and at the end of both needles, until I had 1 s remaining on each needle. Pull the yarn through the stitches.
Weave in ends and block.
I will give this pattern out for personal use only. You may not alter, publish or reproduce this pattern in any way without my permission. I will not give permission to sell garments made using this pattern or make this pattern into a kit. I'll reserve all rights to change, reproduce, reprint or sell this pattern. I hope you respect this information concerning copyrights.


5 comments:
Tuulia, thank you for this lovely pattern -- I will use it soon. And no, I don't think you were "wrong" to do them so quickly. Whoever was upset by that is clearly responding to other things in her life.
Elizabeth D (elizabeth dot a dot durand at gmail.com)
Hi!
Thank you for the lovely pattern. I was wondering how many stitches you pick up on the plam side for the thumb? (Besides the gusset stitches) I love knitting mittens and these are so nice. I just want to do them right!
Sally
Hi Sally! I usually pick up 1 to 3 stitches, as necessary. To avoid leaving holes, make sure you pull the yarn tighter than you normally would, and maybe pick up a couple of extra stitches, which you can decrease on the next round. :)
Good luck with your mittens!
Linkitin lapasohjeesi Lapsakuun blogiin. Ilmoita, mikäli et halua ohjetta sinne linkitettävän. Kiitos!!!
pieni-iloinen at luukku piste com
THANK YOU
Post a Comment