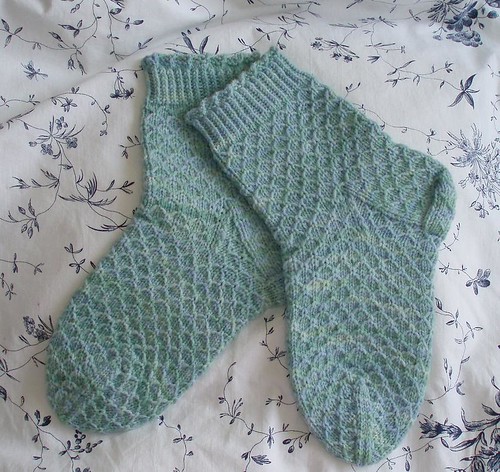
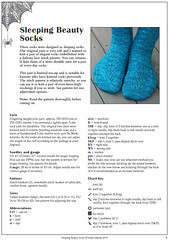
Yarn: Knitpicks 100 % merino, fingering weight, 100 g = 440 yds.
Needles: DPN's size 2.
Gauge: 7 s per inch = 4 inches. 28 s = 10 cm.
Shoe size: US 10 1/2, European 40-41. There's some tips on how to make the socks smaller at the end of the pattern. If you need to make the leg narrower or use different size needles, the stitch count in the slip stitch pattern is a multiple of 4.
Level: Advanced. You should know how to knit using DPN's, and also the basic techniques of sock knitting are handy.
Note: I knit using the continental method, so some explanations of my techniques may not apply to knitters using the English method. These socks are possible to knit using both methods! If you have any questions, please contact me, and I'll try to help. My email is tuuliasalmela{REMOVETHIS} [at] yahoo dot com.
Short list of abbreviations:
k = knit
k tbl = knit through the back loop (twisted stockinette)
p = purl
sl = slip
r = row(s)
s = stitch(es)
k2tog = knit 2 together
k2togB = knit 2 together through the back loop
p2tog = purl two together
rpt = repeat
wyif = with yarn in the front
Latvian Twist Edge:
Cast on 60 stitches. Knit 3 rows in garter stitch. Knit then the decorative edging in 1 row:
*k4, rotate the left hand needle under the cast-on edge and then behind and over the top of the right hand needle until the s are ready to be knit again*, rpt *-*to the end.
Transfer the s onto 4 DPN's, 15 s on each needle. K 2 rows, then continue with twisted rib.
Plain Egde:
Cast on 60 s. Transfer the s onto 4 DPN's, 15 s on each needle.
Twisted Rib:
Knit 10 rows in twisted rib as follows: *k 1 tbl, p 1*.
Knit 2 rows and then begin the slip stitch pattern.
Slip Stitch Pattern:
r 1: *k 1, wyif sl 3*, rpt *-*. Because the yarn that's left of the slipped stitches will be knit after 1 r, it should be a bit loose. Otherwise the cuff will be too tight.
r 2: k.
r 3: k 2, *pick the left over yarn from the slipped stitches onto the left hand needle, knit the stitch, so that the yarn will be knit together with the stitch. [I did this by picking the left over yarn with my right hand needle, then I put my right hand needle through the s, I picked the yarn. brought the yarn from the ball through the stich and underneath the left over yarn.] k 3.* rpt *-*, k 1.
r 4: k. NOTE! The last s of the r must be slipped wyif!
r 5: wyif sl 2, *k 1, wyif sl 3*, rpt *-*. The last slipped stitch of the previous r will be knitted normally.
r 6: k.
r 7: *k the left over yarn as on r 3, k 3*, rpt *-*.
r 8: k.
The last stitch on r 4 (which is slipped) will produce a seamless repeat of the pattern, so the beginning and the end of the row will not be visible in the finished sock.
Rpt the slip stitch pattern in total of 5 times, r 7 being the last one. The heel will be worked on the last two needles of your row (instead of the regular first and last), again for the seamless repeat of the pattern. The heel is a regular English (or Dutch) heel.
Heel:
When you have knitted the last r of the cuff (which must be r 7 in the pattern), turn the piece over and purl the stitches on the 3rd and 4th needle (wrong side of the heel flap). All the even numbered rows of the slip stitch pattern will be purled instead of knitted. Continue knitting the heel flap with the slip stitch pattern, until your heel flap is 30 r high. Then start the heel decreases:
Divide the s onto three groups of 10 s. (You may use stitch markers to do this.)
r 1 (right side): k 19, k2tog tbl, turn.
r 2: sl 1, p 8, p2tog.
r 3: sl 1, k 8, k2tog tbl.
Rpt rows 2 and 3 until you have the middle 10 s remaining on the needle. Transfer these s onto two needles (5 on each). These will be your new first and fourth needles. The end of the row is between these two needles.
Gusset decreases:
K the stitches on the 1st needle, then pick up and k 15 s along the side of the heel flap. Continue knitting the slip stitch pattern on needles 2 and 3 (since r 7 was the last before the heel flap, continue the pattern on r 8, i.e. k all the s), then pick up and k 15 s along the other side of the heel flap and k all the s on the 4th needle.
Continue the slip stitch pattern on needles 2 and 3 while working your gusset decreases:
First needle: K in the slip stitch pattern to the last 3 s, then k2tog, k 1.
Fourth needle: K 1, k2tog tbl, k in the slip stitch pattern to the end of the r.
Continue these decreases until you have 60 s.
Notice: When you've worked all your gusset decreases, the slip stitch pattern should continue seamlessly from 1st to the 2nd needle (and so on). You must perform some Math to do this, since the pattern starts at the beginning of the 1st needle and the decreased stitches are between your remaining stitches on needles 1 and 2 (and 3 and 4).
Also notice that if you started the heel flap on needles 3 and 4 of the cuff, the beginnings of your rows are slightly different. On r 4 of the pattern, you must sl the last two stitches (instead of one), so the pattern is 1 s off on the foot. Since the number of s is again multiple of 4, the pattern continues seamlessly, even though the beginning of the row is different.
Here's the pattern for the foot:
r 1: *wyif sl 3, k 1*, rpt *-*. Because the yarn that's left of the slipped stitches will be knit after 1 r, it should be a bit loose. Otherwise the cuff will be too tight.
r 2: k.
r 3: k 1, *pick the left over yarn from the slipped stitches onto the left hand needle, knit the stitch, so that the yarn will be knit together with the stitch, k 3.* rpt *-*, k 2.
r 4: k. NOTE! The last 2 s of the r must be slipped wyif!
r 5: wyif sl 1, *k 1, wyif sl 3*, rpt *-*. The last 2 slipped stitches of the previous r will be knitted normally.
r 6: k.
r 7: k 1, *k the left over yarn as on r 3, k 3*, rpt *-*, k 2.
r 8: k.
Foot:
Continue working according to the pattern until you have 9 pattern repeats. Then begin the toe decreases.
Toe:
needles 1 and 3: k all the s according to pattern to the last 2 s, k2tog.
needles 2 and 4: k 1, k2tog tbl, k the remaining s according to pattern.
Continue these on every other r until you have 8 s on each needle. Then rpt these decreases on every r until you have 2 s on each needle. Cut the yarn 6 to 8 inches after the last s, pull the yarn through all the s. Weave in ends and block.
Make the second sock and wear proudly :)
For simplicity, you may choose to knit the hourglass heel instead of the regular heel. Then you won't have to knit the gusset decreases at all, which makes the beginning of the foot slightly easier and simpler. However, because of the slipped stitches, the pattern produces a fabric, which is not very flexible. This is why I chose this form of heel for my socks.
The toe decreases should begin when the foot measures roughly 2 inches or 5 cms less than the desired length. Use this information when figuring out the amount of repeats for the foot in socks that are smaller than mine.
The copyright of the pattern is entirely mine and I will give this pattern out for personal use only. You may not alter, publish or reproduce this pattern in any way without my permission. I will not give permission to sell garments made using this pattern or make this pattern into a kit. I'll reserve all rights to change, reproduce, reprint or sell this pattern. I hope you respect this information concerning copyrights.
I hope you enjoy my pattern. Please contact me if you have any questions, concerns or suggestions!
Happy knitting!




7 comments:
I'll comment myself since I'm too tired to log on to Blogger again :)
The yarn was hand dyed with a mix of Kool Aid Lime, Grape and Yellow and Rit-Dye Navy Blue (I think). I used very little of dye mixture and lots of water. I love the colors!
ihana sukkamalli! kiitos vaan ohjeesta :) mäkin tahdon yhtä värikkäät sukat kuin nuo hamsterisukkaset.
mursuliina: siihen on olemassa suomenkielinenkin ohje parin viestin paassa, ei tarvitse pakosti englanniksi neuloa ;)
Kiitos sukkakommentista :))
Thank you for posting in English this pattern. It looks like one amazing pair of socks, I would love to try them one day. Best wishes for TeamDPN!
Äidille juuri eilen esittelin blogiasi muiden muassa (kävi hyvin, kun äiti käytti hiirtä ja minä sain neulottua). Hän katsoi mallia ja muisteli, että tuo näyttää samalta kuin vanhan ajan tumput. Hänellä oli joskus ollut tumput, jotka oli tehty niin, että pohjaväri oli punainen ja ristikko oli valkoisella. Sitten rupesin vasta itsekin katsomaan mallia tarkemmin, en jotenkaan ollut rekisteröinyt pintaneuletta ollenkaan, katsonut vain, että Hienot..
Täytyypä kokeilla itsekin... Jos vaikka äiti tarvitsisi nostalgia-tumput... ;)
kannibaalipupu: kokeilin sita mallineuletta aamulla, siita naytti tulevan ihan ok myos kirjoneuleena. Laitan kuvia ja ohjetta kunhan saan sen ympattya johonkin neuleeseen :)
That's a great pattern. Very nice.
Post a Comment